
Sponsored by Innovatus Imaging

By Matt Tomory

We often get questions asking, “What’s the best way to test ultrasound probes in the field?” It’s interesting that OEM user and service manuals don’t go into much, if any, detail into how to assess probe performance. It’s often left up to individual HTM teams to determine what, how, and when to test a probe. The process actually varies, or should vary, based upon the scope of the environment.
Probe Manufacturing
In our FDA-registered probe manufacturing facility, our teams utilize a host of instruments to assess probe performance. Devices such as an automated pulse echo instrument, acoustic intensity measurement system, hydrophone, system consoles, and others are used to fully qualify components and finished-goods ultrasound probes for sale. This level of testing is extremely costly, very time-consuming, and requires a high-level of focused expertise. These types of tests would not be practical in the field.
Probe Repair
Depending upon your choice of probe repair provider or source for replacement probes, the type and level of testing might greatly differ. Some providers might utilize commercially available probe testing devices, while others may only perform basic image testing on a system console. As a premium repair provider, and based upon our probe manufacturing expertise, Innovatus utilizes both test methods above and others. We’ve even developed proprietary testing devices due to some limitations with commercially available products. Our goal is to acquire results that can be compared to model-specific benchmarks.
Clinical Environment
As mentioned above, there are companies that design commercially available probe testing devices that have the potential to quantify probe performance. Some even offer a simple pass/fail result. A whole host of parameters can be measured, most of which are a result of the probe’s technical design, and most of which cannot be altered by corrective action performed in the field. After 37 years of ultrasound experience, I can confidently say that anywhere from 20% to 45% of all probes in clinical use TODAY may require some level of repair if perfection is the standard. Think about how a quantifiable or pass/fail test, performed on every probe in clinical use, and not recommended by the OEM, could affect HTM budgets and overall health care costs.
Very frankly, commercially available probe testing devices are not needed for the clinical environment. What’s truly needed is a tissue mimicking phantom, a known-good and properly configured system console, familiarization with ultrasound technology, and training on how to perform QC/QA (quality control/quality assurance) testing. We recommend that probes in clinical use be assessed utilizing criteria established by the ultrasound accreditation organization AIUM (American Institute for Ultrasound in Medicine).
The first, best step for field testing a probe is a thorough visual and mechanical inspection. Begin with the lens and inspect for nicks, cuts, holes, excessive wear, or a missing or open seal surrounding the lens. If found, there’s a good possibility that chemical disinfectants or contaminants have entered the probe and have begun to degrade the probe’s acoustics or electrical components. Thoroughly examine the probe housing, looking for cracks, open seams, or any breach in physical integrity.
Examine the strain relief and verify that it is well-seated in the probe housing. It should be flexible and not overly stiff. Strain reliefs will become overly stiff, and less effective, with exposure to unapproved chemicals or long-term exposure to even approved chemicals.
The cable sheathing should not have any nicks, cuts, or breaks along its entire length. The presence of tape on the cable is a good indication that the cable has sustained some damage. Finally, inspect the connector for any broken or bent pins. Immediately remove from service, any probes that have connector damage. A bent or broken pin can damage the connector board on a system console which will, in turn, damage the next probe that is plugged-in to that port.
You may also consider performing an electrical leakage test on the probe as part of a comprehensive inspection or to verify any concerns with physical integrity. On standard probes, leakage testing can be performed using your phantom and an electrical safety meter (expensive/complex electrical safety tools not needed). I prefer to use the top of a tissue-mimicking phantom, filled with saline, so I can combine this with the image test. Start by setting up your leakage meter for chassis leakage and initializing the probe on the ultrasound system. Insert the nosepiece in the water, complete the circuit by inserting your leakage meter’s probe into the water, and then open the ground on the leakage meter to measure electrical leakage.
So, what about performance testing?
As mentioned above, for field testing, we recommend using criteria published by the AIUM in the AIUM Quality Assurance Manual for Gray Scale Ultrasound Scanners 2014 and a few other tests. Key performance tests are 1) Overall Image Uniformity (AIUM: Element or Channel Failure), 2) Maximum Depth of Penetration, and 3) Cable Performance Testing. The ideal results would have each probe model perform consistently with those of like models, over time.
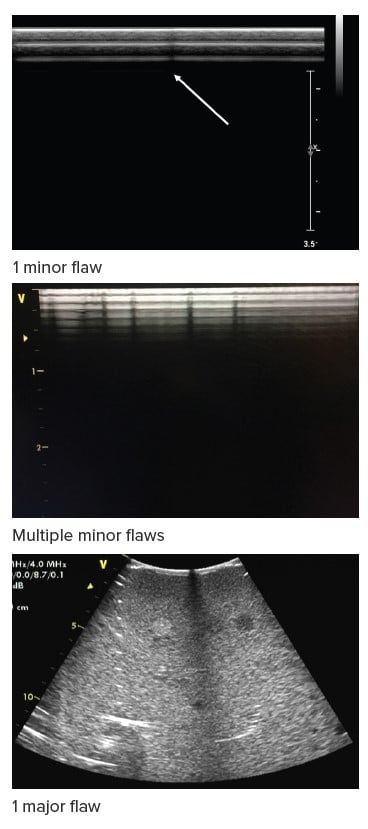
Regarding image testing, AIUM has a ranking for transducer image quality flaws:
- No flaws (all elements & cable perfect).
- One or two minor flaws detectable (singular dropouts): Probe is operational and can be used clinically, inspect occasionally.
- Three or more minor flaws, and/or 1 or more major flaws present (significant shadow): Repair/replace when convenient.
- Major flaws present: Remove from service immediately, and repair/replace.
How Innovatus can help
It’s easy to see that this column doesn’t provide enough space to detail all the information to perform field testing of ultrasound probes. No problem, we’ve authored a guide to help HTM teams perform their own QC testing, using only a tissue mimicking phantom and system. We welcome the opportunity to share the guide, or hold a webinar to present how to perform QC testing in the field. To request a copy of our Transducer Assessment Guide or to discuss how we can help your team enhance their ultrasound knowledge or implement QC testing, please reach out to training@innovatusimaging.com.
Matt Tomory, Vice President of Sales and Marketing.
