Sponsored by Innovatus Imaging

By Ted Lucidi
We’ve explored how excessive RF energy in the vicinity of an ultrasound study can affect image quality (typically during color Doppler imaging) and that the amount of and quality of RF suppression is related to the integrity of the shielding that runs from the probe, through the scanner, extending to the accessories/external interfaces and ultimately to the system and facility ground.
Last month, we provided multiple, unique scenarios in which external variables were the root cause of the artifact and presented the argument that, according to our data with ultrasound probes reported to experience this issue, that less than 10% actually have a hard failure.
Typically, by the time that a service engineer receives a request to investigate a potential noise problem, there may be little chance that the problem will be present and be reproducible once on-site. This issue is one of the most challenging to solve. Only through thorough investigation, detailed documentation, process of elimination, and impeccable timing can the source actually be identified … and then, only some of the time.
Important guidelines for troubleshooting ANY image quality or performance issue.
- Always, compare the performance of a probe against that of the same EXACT model. There are differences between probe model designs and comparing the performance of an L12-5 to that of a C5-1 may introduce variables. If comparing performance of one probe model to that of another, artifacts may shift to a different area of the image, may be more/less pronounced, or may not be present at all.
- Always, compare performance using the same EXACT system preset and EXACT system settings. Scanner presets can pre-configure over 50 different settings within the scanner hardware and software, and not remaining consistent can introduce variables.
- Always test the system/probe in the same physical location in the facility, the same room, similar scanner placement, using the same electrical outlet and the same network connection.
Best practices and proven troubleshooting tips for noise artifacts
- Provide a cellphone number to the end-users so that they can contact you when the problem is occurring. If you are in the same facility, drop what you are doing and immediately respond. You should personally view the noise and the environment.
- Identify if the problem is isolated to only one probe model.
- Identify if the problem is isolated to only one scanner.
- Identify if the problem is isolated regionally … only occurring in 1 room, within the OR, or only on certain floors. Document the exact location and the exact electrical outlet in-use.
- Identify if the problem is isolated temporally … only occurring in the morning or afternoon. Document the exact time.
Verify Quality Grounding: A best-practice for troubleshooting most ultrasound issues is to start with a clean, known-good system to minimize variables. A solid system ground is integral to RF suppression, so perform a power cord resistance test (electrical safety test) to verify a quality ground and address as required. Grounding/spring clips surround the scanner’s connector ports (which extend the scanner’s system ground to the probe). Inspect and replace broken, missing or worn spring clips and remove any oxidation from their surfaces using a mild abrasive pad, eraser, alcohol prep pad or similar.
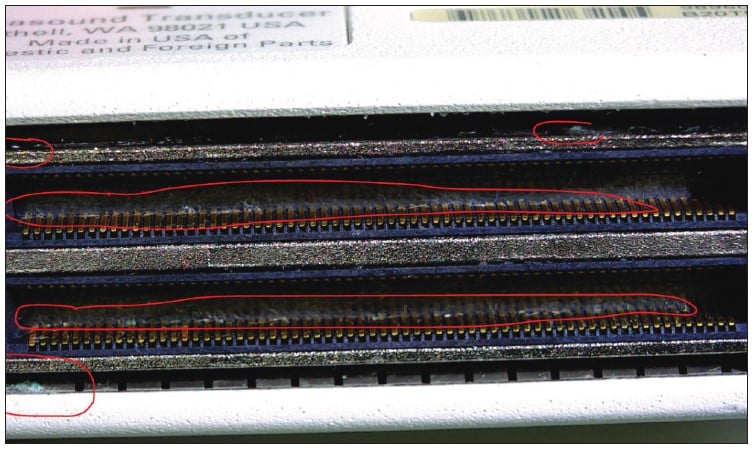
Verify a Clean System: Due to the volume of linens in-use, health care facilities are extremely dusty environments, and dust build up inside of equipment can lead to a whole host of problems. Depending upon the amount of and the location of dust and debris, it can act as an insulator between connections or a bridge between components, electrical traces and ground planes. Inspect the connector ports of the scanner for excessive dust build up, as a fine layer of dust or oxidation can compromise the quality of connection. This is extremely important for scanners/probes using pin-less connectors, such as the GE E-series and Siemens S-series scanners. Next steps would include a thorough cleaning of the interior of the scanner. Open the front-end processor of the scanner, remove, clean and reseat all PCBs. Thoroughly clean the power supply and fan assemblies, as these areas become coated with dust despite the use of and cleaning of the scanner’s air filter(s). Most card cage covers use spring clips, similar to those surrounding the connector ports. A common problem is a buildup of oxidation or decreased tension on the clips which can affect RF suppression. Inspect the insides of card cage covers or other areas which may have ground/spring clips, removing any oxidation.

End-User Troubleshooting: There’s some basic troubleshooting that end-users can and should perform when noise issues present. Have the sonographer disconnect/reconnect the probe to the scanner using the same scanner port and observe the image for noise. Follow that by disconnecting/reconnecting the probe using a different scanner port. Finally, have the sonographer unplug items, in the immediate vicinity of the scanner, such as gel warmers, blanket warmers, electric beds, etc. and turn off all cellphones.
External Connections: It may be out of the comfort zone for some users, but next steps should include disconnecting any/all external cables from the scanner (external video, USB, network, etc.) to eliminate broken/open shielding as a potential source. Next, power off the scanner, move the power plug to a different outlet (preferably on a different electrical circuit), power on and observe the image.
Additional Steps: Devices such as treadmills, X-ray and CT systems, motors, surgical lights or other devices in the immediate vicinity of the scanner could experience breakdowns in their own shielding. Further troubleshooting involves relocating the scanner to a different physical location within the department followed by relocating the scanner to a different physical location elsewhere in the facility and observing the image.
Our world is full of electro-magnetic pollution and most medical devices are designed to address it. RF interference is like the wind, it comes and goes. It may be strong today and weaker tomorrow. When it seems as though replacing the probe is the easiest solution and in doing so appears to solve the problem, just wait. Until you uncover the true root cause, the search will never be over.